I started this blog with the idea that I would post crafts and ideas that I did from around the house. As you can see that has not happened as often as I would like and I had planned to let my blog go down. However recently I have decided to take some steps to control my overeating. I am planning to "journal" these feelings and decided to put them here.
11 October 2012
10:14am
Today when I stepped on the scale I found myself disgusted with the fact that this week I have put on four pounds. I started the week at 209.9 and wanted to be at 208.8 by the end of the week. I have let myself eat whatever, whenever I wanted. I discovered there is an Overeaters Anonymous meeting at at a church not far from where I work on Monday I am going to go. I need to get my overeating under control.
There are times I don't even like what I am eating but I just can't seem to stop. This is cumpulsive and unhealthy.
At 10:20 this morning I realized I was hungry and stated to eat peanut butter off a spoon (not a good snack). I put the spoon down before eating it and felt a small sense of pride. I know this sounds silly but if you have dealt with overeating at all this really is a success. I have decided between meals, if I get hungry, I will write out what I am feeling and keep my hands busy.
Current feelings: I have a headache and am frustrated with a potential sinus infection.
My regular lunch time is 36 minutes away and I am going to make it!
Update: I did make it to my regular lunch time with out snacking. I also ate only half the lunch and took the rest home for dinner. I did eat unhealthy snacks last night but I lost almost two pounds, just by not eating all the time.
Goal for Friday: Go to the gym and walk for at least 30 minutes.
Friday, October 12, 2012

Saturday, April 21, 2012
Rainy Day Fun
Well it is not actually raining but it is cold and yucky outside and Boom loves to be outside. Needless to say rainy days are not our favorite...for that matter we can lump cold snowy days in Ohio under the same category!
Since it is not a nice day, I decided to get out our finger paints. Our kitchen window looks out onto her swing set, so I let her pictures dry on the window. This brightens up our day!
We used the Crayola finger paint tubes. There are lots of make your own fingerpaints options availble on the web, but today I went the easy route!
Here are Boom's pretty pictures!
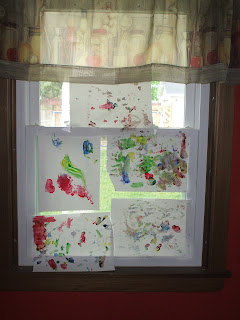
Since it is not a nice day, I decided to get out our finger paints. Our kitchen window looks out onto her swing set, so I let her pictures dry on the window. This brightens up our day!
We used the Crayola finger paint tubes. There are lots of make your own fingerpaints options availble on the web, but today I went the easy route!
Here are Boom's pretty pictures!

Sunday, April 15, 2012
Homemade Lipgloss
I love lip gloss! I looked several places online to find a fun and more importantly easy way to make my own. So after multiple searches and some liquidy failures, I find this recipe works well for me.
Supplies:

This recipe makes about five or six small bead jars.
Step 1: Put 1/3 cup on Petroleum Jelly in microwave for about 50 seconds. Warm jelly is easier to work with.
Step 2: Add one drop of Vitamin E oil into the petroleum jelly and stir. This will help those cracked lips and one small jar of Vitamin E oil lasts forever. I still have my first one.
Step 3: Add in flavoring. If you are using jello I recommend about 1 teaspoon of jello powder. Put it on a paper plate add just a little bit of water and stir with the toothpick so the jello is a paste. This will stop your lip gloss from having jello crusties. Then add the paste to the jelly and stir.


 These are my vanilla lip glosses.

It took me just under an hour to do all 25. The blue are vanilla, pink are peach, yellow is lemon, orange is peach lemon and green is cake.
Enjoy!
Supplies:
- Lip gloss containers - I use bead storage containers (You can get them in packs of 25 for $9.99 or $7.99 when they are on sale at Joann's)
- 1/3 cup of Petroleum Jelly
- Toothpicks
- Bowl - I recommend a disposable bowl because it is hard to clean a regular bowl full of petroleum jelly - learn from my mistake!
- Flavoring - I use vanilla and jello
- Food coloring - the jello can also provide color
- plastic baggie
- Scissors
- cup (optional)
- Vitamin E oil (optional)

Step 1: Put 1/3 cup on Petroleum Jelly in microwave for about 50 seconds. Warm jelly is easier to work with.
Step 2: Add one drop of Vitamin E oil into the petroleum jelly and stir. This will help those cracked lips and one small jar of Vitamin E oil lasts forever. I still have my first one.
Step 3: Add in flavoring. If you are using jello I recommend about 1 teaspoon of jello powder. Put it on a paper plate add just a little bit of water and stir with the toothpick so the jello is a paste. This will stop your lip gloss from having jello crusties. Then add the paste to the jelly and stir.

Step 4: If you want more coloring add a drop or two of food coloring to the jelly and stir. Not to much - you don't want to permanently stain your lips.
Step 5: Put the jelly in a plastic bag. The easiest way I have found is to put a plastic bag around a cup and then spoon the jelly into cup. The cup will look like this:

Step 6: Cut the tip off the end of the bag with scissors.
Step 7: Pipe the lip gloss into storage container.


Enjoy!
Subscribe to:
Posts (Atom)